As an Amazon Associate, I earn from qualifying purchases at no extra cost to you.
How to Change Oil 2020 Toyota Sienna the Easy Way
 ByFawaz
You probably didn’t know your minivan has a secret soul that loves fresh fluids just like you love a cold drink. Most folks think a dealership trip is the only way to keep things running. Actually, learning how to change oil 2020 Toyota Sienna is a great way to bond with your car.
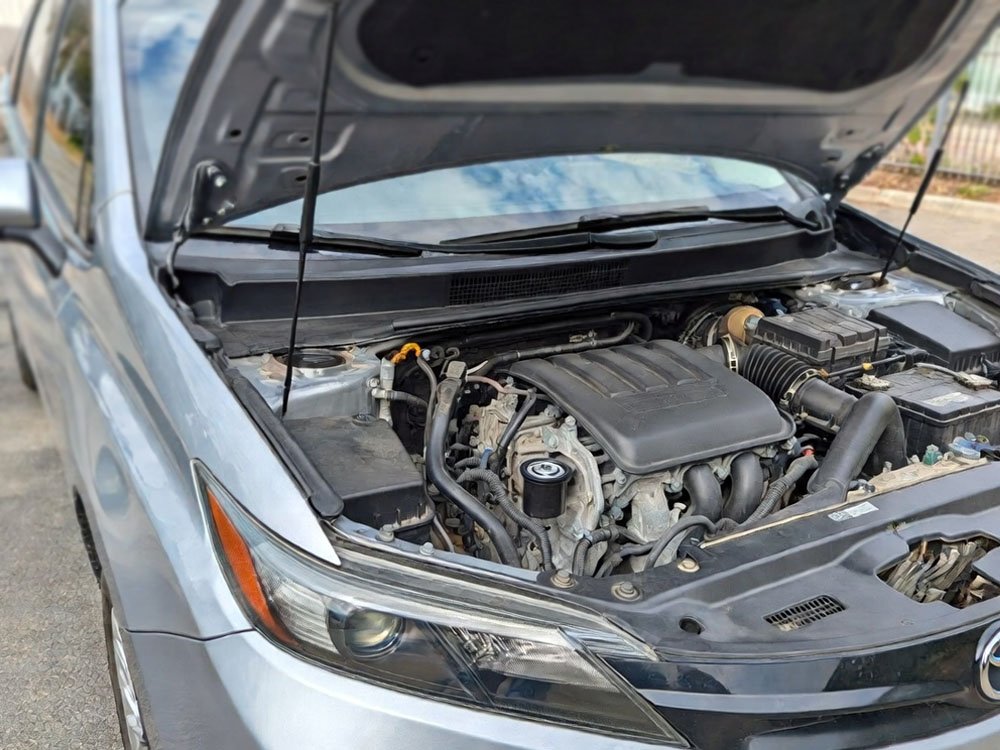
First, gather a 14mm wrench, a new filter, and 6.4 quarts of 0W-20 synthetic oil. Lift the front of your van safely with ramps or a jack and stands. Find the drain bolt on the oil pan and unscrew it to let the old black liquid flow out. While that drains, use a special tool to remove the plastic filter housing located near the front. Swap the old paper filter for a new one and replace the rubber O-ring too. Tighten the filter and the drain bolt back into place. Finally, pour the fresh oil into the engine using a funnel and check the dipstick level.
Is It Hard to Learn How to Change Oil 2020 Toyota Sienna?
Changing the oil on this specific van is actually quite simple once you get under the bumper. The 3.5L engine is designed with a lot of space, so you won’t scrape your knuckles too much. You just need to be patient with the plastic shields that cover the bottom of the engine.
Many people feel scared because this van uses a cartridge filter instead of a metal screw-on can. Don’t let that tiny paper tube intimidate you at all. It just sits inside a permanent plastic cup that you unscrew and wash out. It is actually cleaner for the earth and cheaper for your wallet over time.
Once you do this once, you will never want to pay a shop sixty dollars again. You get to see exactly what is happening inside your motor. It gives you peace of mind knowing the job was done right. Plus, you can check for leaks or loose bolts while you are already down there.
- Buy a high quality 64mm 14-flute oil filter wrench.
- Always use 0W-20 full synthetic oil for this engine.
- Make sure you have a large drain pan for 7 quarts.
- Keep plenty of rags nearby for any accidental drips.
- Check your oil level on flat ground after the job.
- Reset your “Maintenance Required” light on the dashboard screen.
Steps for Changing the Oil in Your 2020 Toyota Sienna the Right Way
Get Your Tools and Supplies Ready
You need to have everything within reach before you start the job. Hunting for a wrench while you have oil on your hands is never a fun time. Grab your 14mm socket for the drain plug and that special 64mm filter tool I mentioned earlier. You also need a new crush washer for the drain bolt so it doesn’t leak later.
I always suggest buying the OEM Toyota filter from a local dealer or online. These filters come with the two rubber rings you need and a little plastic drain tool. This tool lets you empty the filter housing before you unscrew it completely. It saves you from getting a sleeve full of hot oil, which is a mistake I made many times.
Lastly, make sure your oil is 0W-20 and that you have a solid funnel. I like to lay down a piece of cardboard under the van just in case I miss the pan. It keeps your driveway clean and keeps your spouse happy too. Being organized is half the battle when working on a Toyota.
- Check your owner’s manual for the exact oil capacity.
- Ensure your jack stands are rated for a heavy van.
- Wear gloves to keep your skin safe from chemicals.
- Have a flashlight handy to see into dark corners.
Lift the Van Safely and Securely
You should drive the van for five minutes to warm up the oil so it flows fast. Then, park it on a flat spot and pull the handbrake as hard as you can. Use ramps if you have them because they are very stable for a big Sienna. If you use a jack, always put stands under the frame points.
Never trust a hydraulic jack alone because they can fail without warning. I always give the van a little shake once it is in the air to make sure it is solid. If it moves, stop and fix the position before you crawl under there. Safety is the most important part of any DIY car project.
Once it is up, look for the plastic splash shield under the engine. You will see a small square door held by a few screws or clips. Open that up to reach the oil pan and the filter housing easily. This little door is a life saver because you don’t have to take the whole big shield off.
- Block the rear wheels so the van cannot roll back.
- Wear safety glasses to keep dirt out of your eyes.
- Make sure the engine is warm but not scalding hot.
- Give yourself plenty of room to move your arms freely.
Drain the Old Oil from the Pan
Find the 14mm bolt on the back of the metal oil pan. Position your drain pan slightly behind the bolt because the oil will shoot out in an arc at first. Slowly loosen the bolt with your wrench until you can turn it with your fingers. Press the bolt inward as you unscrew it to keep the oil from leaking early.
When you reach the end of the threads, pull the bolt away quickly to keep your hands clean. Let the oil drain until it is just a very slow drip, which usually takes ten minutes. Take this time to clean the drain bolt and put the new metal crush washer on it. The washer is flat on one side, so pay attention to how the old one sat.
If the oil looks very dark or has a burnt smell, don’t worry too much. That just means it was doing its job of cleaning the engine’s internal parts. Wipe the area around the hole with a clean rag before you put the bolt back in. Tighten it firmly but don’t use all your strength or you might strip the threads.
- Look for metal flakes in the old oil as a health check.
- Don’t lose the drain bolt in the bucket of old oil.
- Tighten the bolt to about 30 foot-pounds if you have a torque wrench.
- Always use a new washer to prevent slow drips on your floor.
Remove and Replace the Oil Filter
Now we tackle the plastic filter housing which is just a few inches away from the drain plug. Use the small plastic piece that came with your filter to drain the housing first. You push it into the bottom of the housing and watch the oil flow out of a little tube. This keeps the mess to a minimum and makes the housing easier to grip.
Once it is empty, use your 64mm wrench tool to unscrew the whole plastic cap. Pull out the old paper filter and the big rubber O-ring from the grooves of the cap. Clean the inside of the cap with a rag to get rid of any sludge or grit. Slide the new filter in and make sure it clicks into the center post correctly.
The most important trick is to wet the new rubber O-ring with a bit of fresh oil. This helps it slide into place and creates a perfect seal when you tighten it. Screw the housing back onto the engine by hand first to make sure you don’t cross the threads. Finish it off with the wrench until it sits flush against the metal.
- Check that the old O-ring actually came off the housing.
- Never over-tighten the plastic housing or it might crack.
- Use a small screwdriver to pop the old ring out easily.
- Make sure the filter is sitting straight before closing it.
Fill the Engine with Fresh Synthetic Oil
Climb out from under the van and open the hood to find the oil fill cap. It is usually labeled with “0W-20” right on the top so you can’t miss it. Place your funnel in the hole and start pouring in your new synthetic oil. I usually pour in six quarts and then stop to check the level before adding more.
The 2020 Sienna takes about 6.4 quarts, but every van is a little bit different. Pouring slowly helps prevent bubbles and keeps the oil from backing up out of the funnel. Once you have added the right amount, put the cap back on and tighten it. Now, start the engine and let it run for a minute to move the oil around.
Listen for any weird noises, but it should sound smooth and quiet. Turn the engine off and wait a few minutes for the oil to settle back into the pan. Pull the dipstick out, wipe it clean, and shove it back in all the way. Pull it out again to see if the oil line is between the two dots.
- Don’t spill oil on the hot exhaust manifold.
- Use a high-quality synthetic oil for the best protection.
- Always double check that the fill cap is tight.
- Keep a spare quart in the trunk for long road trips.
Reset the Maintenance Light and Clean Up
Your van has a computer that tracks when you need an oil change. You need to tell it that you just finished the job so the light goes away. Use the arrow buttons on your steering wheel to go to the “Settings” menu on the dash. Look for “Vehicle Settings” and then select “Scheduled Maintenance” to reset the data.
It will ask if you want to reset the system, so just click “Yes.” Now your van is happy and won’t beep at you every time you start it up. Take your old oil and put it back into the empty jugs you just emptied. Most auto parts stores will take this old oil for free and recycle it for you.
Clean your tools with a rag and put them away so they stay in good shape. Check under the van one last time to make sure there are no leaks from the bolt or filter. If everything is dry, you are officially done and ready for another 5,000 to 10,000 miles. You should feel proud because you just saved money and took great care of your ride.
- Wipe down any oil spills on the engine block.
- Write down the date and mileage in a small notebook.
- Wash your hands with grease-cutting soap or lemon juice.
- Store your tools in a dry place to prevent rust.
Is It Okay to Use Different Oil for the Sienna?
You might see different types of oil on the shelf at the store. However, Toyota specifically asks for 0W-20 for the 2020 Sienna to keep the engine healthy. This oil is very thin, which helps it flow quickly through small parts when you first start the car. Using thicker oil can actually hurt your gas mileage and make the engine work harder than it needs to.
Synthetic oil is also a must because it lasts much longer than the old conventional stuff. It handles heat better and doesn’t turn into thick sludge as easily. Even if you find a cheaper bottle of regular oil, please stick to the synthetic 0W-20. It is an investment in making your van last for 200,000 miles or even more.
If you are in a pinch and can’t find 0W-20, the manual says you can use 5W-20 once. But you must change it back to the correct weight at the very next oil change. I always suggest just keeping an extra bottle in the garage so you never have to worry. Your engine will thank you by staying quiet and powerful for years.
- 0W-20 oil is designed for modern, tight engine tolerances.
- Synthetic oil provides better protection in extreme cold weather.
- Using the wrong oil could potentially void your warranty.
- Check the bottle for the “API” starburst symbol for quality.
- Avoid mixing different brands of oil if you can help it.
- Full synthetic is always better than a synthetic blend.
| Item | Specification | Why It Matters |
| Oil Grade | 0W-20 Full Synthetic | Protects the engine and improves fuel economy. |
| Oil Capacity | 6.4 Quarts (6.0 Liters) | Ensures the engine has enough fluid to stay cool. |
| Drain Plug Torque | 30 ft-lbs (40 Nm) | Prevents the bolt from falling out or leaking. |
| Filter Type | Cartridge Style (90915-YZZN1) | Filters out tiny bits of metal and dirt. |
| Change Interval | Every 10,000 Miles | Keeps the internal parts from wearing out too fast. |
| Wrench Size | 14mm and 64mm | Tools needed to open the pan and filter housing. |
Final Thoughts
You really did it! Learning how to change oil 2020 Toyota Sienna is a big step toward being a DIY pro. It feels great to know exactly what is going on under your hood. Now that you’ve finished, treat yourself to a nice drive. Keep an eye on that dipstick once a month, and you’ll keep your family van running like a dream for a long, long time.
Frequently Asked Questions (FAQs)
Is It Necessary to Change the Crush Washer?
Yes, it is very important to use a new washer every time. The metal on the washer squishes down to create a perfect seal against the oil pan. If you use the old one, it might be too thin or deformed to stop leaks. A tiny leak can turn into a big mess on your driveway over time.
Can I Use a Regular Wrench for the Filter?
No, you really need the specific 64mm 14-flute tool for this van. The filter housing is made of plastic and can break if you try to use pliers or a strap wrench. The special tool fits perfectly and spreads the pressure evenly so nothing cracks. It is a cheap tool that makes the job much safer.
Do I Need to Change the Oil Every 5,000 Miles?
Toyota says 10,000 miles is fine if you use synthetic oil under normal conditions. However, if you drive in lots of traffic or very hot weather, doing it every 5,000 miles is a smart move. It provides extra protection for the engine. I personally like to change mine every 7,500 miles as a middle ground.
Is It Safe to Use Ramps for This Van?
Ramps are very safe as long as they are rated for the weight of a Toyota Sienna. This is a heavy vehicle, so check the weight limit on your ramps first. Always make sure the ramps are on a flat, non-slippery surface. Having a friend guide you up the ramps is also a very good idea.
Can I Mix Different Brands of 0W-20 Oil?
You can mix brands if you really have to, but it is not the best idea. Each brand uses a slightly different mix of chemicals and additives. Sticking to one brand ensures that the chemistry stays consistent inside your engine. If you are just topping off a low level, any 0W-20 is better than no oil at all.
Do I Have to Use a Toyota Brand Filter?
You don’t have to, but I highly recommend it for this van. The Toyota filters are built specifically for the cartridge housing and come with the right gaskets. Some cheap off-brand filters might not fit as tightly or could tear under pressure. Since the price is almost the same, the original part is the best choice.
Is It Normal for the Oil to Be Black?
Yes, it is totally normal for oil to turn dark or black after a few thousand miles. The oil contains detergents that clean the soot and carbon off the engine parts. If it stays clear, it might actually mean it isn’t doing a good job of cleaning. Black oil shows the fluid is working hard to protect your motor.
Can I Change the Oil Without Lifting the Van?
It is very difficult to do this without lifting the front end. The Sienna sits fairly low to the ground, and you need space to reach the drain plug and the filter. Even if you can reach them, you won’t have room to fit a drain pan underneath. Lifting the van makes the work much easier and cleaner.