As an Amazon Associate, I earn from qualifying purchases at no extra cost to you.
How to Easily Install Heads Up Display in Your Car
 ByFawaz
A heads-up display (HUD) is a great tool for any driver. It helps you see important information without taking your eyes off the road. This blog post will guide you through the process of installing a HUD in your car. We will cover everything from what a heads-up display is to the different types available and how to install one step-by-step.
What is a Heads-Up Display?
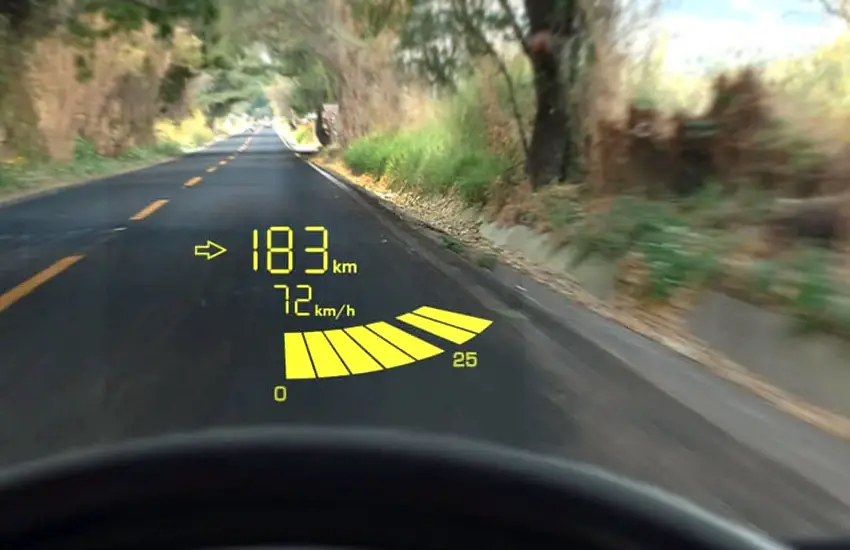
A heads-up display (HUD) is a technology that projects information onto the windshield of your car. It displays important data like speed, navigation directions, and fuel levels in your line of sight. This means you can get information without looking down at your dashboard, which is safer and more convenient.
Benefits of Using a HUD
Using a heads-up display has several benefits. Here are a few:
- Safety: HUDs help you keep your eyes on the road. You don't need to look down at your dashboard, which can reduce the chance of accidents.
- Convenience: With a HUD, you can see important information at a glance. This is especially useful for navigation, as you can follow directions without needing to look at a separate device.
- Real-Time Information: HUDs can provide real-time data about your car, such as speed and fuel consumption. This allows you to make better driving decisions.
- Customizable Display: Many HUDs allow you to customize what information is displayed and how it looks. This means you can set it up in a way that works best for you.
- Modern Look: A heads-up display gives your car a modern feel. It's a great upgrade for older cars that may not have this technology built in.
- Easy Access to Notifications: Some HUDs can show notifications from your phone, like calls or messages. This keeps you informed without distracting you from driving.
Different Types of Heads-Up Displays
There are several types of heads-up displays available. Here are the main types:
- Standalone HUDs: These are separate devices that you place on your dashboard. They connect to your phone or car system to get data.
- OBD-II HUDs: These HUDs connect to your car’s OBD-II port. This port is usually found under the dashboard. They provide information directly from your car's computer.
- Smartphone HUDs: These use your smartphone to project data. You need a special app that can send information to the HUD.
- Built-in HUDs: Some newer cars come with HUDs already installed. These are integrated into the car’s design and provide a seamless experience.
- Reflective HUDs: These projects data onto a reflective screen that sits on your dashboard. You look at this screen to see the information.
- Augmented Reality HUDs: These are advanced HUDs that use augmented reality technology to overlay information on the real world. They are more expensive and not as common.
Choosing the Right Heads-Up Display
Choosing the right HUD for your car can be tricky. You want to find one that meets your needs and fits your car. Here are some tips to help you choose the best HUD.
Consider Your Budget
HUDs can range in price from under $50 to several hundred dollars. Before you start looking, decide how much you want to spend. This will help narrow down your options.
Check Compatibility
Make sure the HUD you choose is compatible with your car. If you go for an OBD-II HUD, check that your car has an OBD-II port. Most cars made after 1996 have this port, but it is always good to confirm.
Look for Features
Different HUDs offer various features. Some common features to look for include:
- Navigation Support: If you want navigation, look for a HUD that supports apps like Google Maps or Waze.
- Bluetooth Connectivity: This allows the HUD to connect to your smartphone for notifications and music control.
- Adjustable Brightness: This feature helps you see the display clearly in different lighting conditions.
- Speed and RPM Display: If you want real-time speed and RPM data, make sure the HUD shows this information.
Read Reviews
Before making a purchase, read reviews from other users. This can give you an idea of how well the HUD works and if it has any common problems. Look for reviews that mention ease of installation and clarity of the display.
Consider Size and Design
The size and design of the HUD matter. You want a display that is big enough to read easily but not so big that it blocks your view. Also, consider how the HUD will look in your car. Choose a design that matches your style.
Think About Installation
Some HUDs are easier to install than others. If you are not comfortable with tools, look for a HUD that comes with clear instructions and does not require complicated installation.
Installing a Heads-Up Display
Now that you have chosen the right heads-up display for your car, it's time to install it. This section will guide you through the installation process step-by-step.
Gather Your Tools
Before you start installing, gather all the tools you might need. Here's a list of common tools for HUD installation:
- Screwdriver: For securing any mounts.
- Cable Ties: To keep wires tidy.
- Adhesive Strips: If you need to stick the HUD to your dashboard.
- Cleaning Cloth: To clean your windshield or dashboard before installation.
- Smartphone or Tablet: If you are using a smartphone-based HUD, have your device ready.
Step 1: Prepare the Installation Area
Before you start, make sure the area where you will install the HUD is clean and clear. If you are using a standalone HUD, find a flat surface on your dashboard where you can see it easily without it blocking your view. For OBD-II HUDs, locate your OBD-II port, which is usually under the dashboard near the steering wheel.
Step 2: Connect the HUD
- For Standalone HUDs: Place the HUD on your dashboard. If it has an adhesive backing, peel off the protective layer and press it down firmly. Make sure it is secure.
- For OBD-II HUDs: Connect the HUD to the OBD-II port. This port is often covered by a small plastic flap. Once connected, make sure the wires are tidy and out of the way.
Step 3: Set Up Power Supply
Most HUDs need power to operate. Here's how to power your HUD:
- Using Car Charger: If your HUD has a car charger, plug it into the car’s power outlet. This is usually found near the center console.
- Hardwiring: If you are comfortable with basic wiring, you can hardwire the HUD to your car’s electrical system. This often requires connecting wires to the car battery or fuse box. If you choose this method, be sure to follow the manufacturer’s instructions carefully.
Step 4: Connect to Your Smartphone (If Applicable)
If your HUD uses a smartphone for navigation or notifications, connect it via Bluetooth or Wi-Fi. Follow these steps:
- Open the settings on your smartphone.
- Turn on Bluetooth and search for devices.
- Select your HUD from the list.
- Follow any prompts to complete the connection.
Step 5: Adjust the Display
Once the HUD is powered on, adjust the display settings. You want the information to be clear and easy to read. Here's how to do it:
- Brightness: Adjust the brightness settings so that it is visible in daylight but not too bright at night. Most HUDs have an automatic brightness feature.
- Positioning: Move the HUD if needed to ensure it is in your line of sight without blocking your view of the road.
- Information Display: Customize what information is displayed. This could include speed, navigation directions, or RPM. Use the HUD’s settings menu to adjust this.
Step 6: Test the HUD
Before you hit the road, test the HUD to make sure it works properly.
- Start Your Car: Turn on the ignition to power the HUD.
- Check the Display: Look for the display to show relevant information like speed and navigation directions.
- Drive Slowly: Take a short drive in a safe area to make sure you can see the display clearly and that it updates accurately.
Step 7: Finalize Installation
Once everything is working correctly, finalize the installation by securing any loose wires with cable ties or adhesive strips. Make sure everything looks neat and tidy.
Troubleshooting Common Issues
Even with a straightforward installation, you may run into some problems. Here are some common issues and how to fix them.
No Display
If the HUD does not turn on, check the following:
- Power Connection: Make sure the power cable is securely connected. If you are using a charger, ensure it is plugged into the outlet.
- OBD-II Connection: For OBD-II HUDs, check that it is properly connected to the OBD-II port.
- Fuse Check: If your HUD is hardwired, check the fuse to see if it has blown. Replace it if necessary.
Inaccurate Readings
If the information displayed is incorrect, follow these steps:
- Reconnect the Device: If using a smartphone, try disconnecting and reconnecting it.
- Calibration: Some HUDs require calibration. Check the manual for instructions on how to calibrate your device.
- Update Software: Make sure your HUD's software is up to date. Many HUDs can be updated via the manufacturer's app.
Visibility Issues
If you have trouble seeing the display, consider the following:
- Adjust Brightness: Increase the brightness settings if it is too dim, especially during the day.
- Change Position: Adjust the angle or position of the HUD so it reflects better on your windshield.
- Clean the Windshield: A dirty windshield can affect visibility. Make sure your windshield is clean and free of smudges.
Connectivity Problems
If you are having issues with Bluetooth or app connectivity, try these tips:
- Restart Devices: Turn off your smartphone and HUD, then turn them back on.
- Re-pair Bluetooth: Go into the Bluetooth settings on your smartphone and forget the HUD, then reconnect it.
- Check App Permissions: Make sure the app has the necessary permissions to connect to the HUD.
Display Flickering
If the HUD display flickers, this could be a sign of a power issue:
- Check Power Supply: Ensure that the power connection is secure and that the outlet is functioning.
- Inspect Wires: Look for any damaged wires that could be causing a poor connection.
Overheating
If your HUD becomes too hot to touch, follow these steps:
- Ensure Proper Ventilation: Make sure the HUD is not blocked by other objects on the dashboard that could trap heat.
- Use at Lower Temperatures: If possible, avoid using the HUD in extreme temperatures.
Maintaining Your Heads-Up Display
To keep your HUD working well, it is essential to maintain it properly. Here are some tips for maintaining your heads-up display.
Regular Cleaning
Keep the display clean for optimal visibility. Use a soft, lint-free cloth to wipe the screen regularly. Avoid using harsh chemicals that could damage the screen. If your HUD has a reflective surface, clean it gently to prevent scratches.
Check Connections
Periodically check the power connections and wires to ensure they are secure and not damaged. Loose connections can lead to display issues.
Software Updates
Many HUDs require software updates to fix bugs and improve performance. Regularly check the manufacturer's website or app for updates. Follow the instructions to update your device.
Store Safely
If you remove the HUD when not in use, store it in a safe place. Keep it away from direct sunlight and extreme temperatures to prevent damage.
Monitor Performance
Pay attention to how the HUD is performing. If you notice any issues, troubleshoot them right away. Keeping the device in good working condition will help extend its lifespan.
Consult the Manual
Always refer to the user manual for specific maintenance tips. Each HUD may have unique requirements, and following the manufacturer’s guidelines will help ensure proper care.
Final Words
Installing a heads-up display in your car is a great way to enhance your driving experience. It helps you keep your eyes on the road while still accessing important information. By following the steps outlined in this blog post, you can easily install a HUD and enjoy its benefits. Remember to choose the right HUD for your needs, follow the installation steps carefully, and maintain your device for the best performance. Happy driving!