As an Amazon Associate, I earn from qualifying purchases at no extra cost to you.
What Does a Bad U-Joint Sound Like?
A bad U-joint may produce a clunking or squeaking sound, especially during acceleration or deceleration. This noise typically indicates worn or failing universal joints in the drivetrain.
If left unrepaired, it can lead to drivetrain issues and potential safety hazards. Proper maintenance, including regular inspection and lubrication, can help prevent U-joint problems and ensure your vehicle operates smoothly. Addressing any unusual sounds promptly can save you from costly repairs down the road and keep your drive safe and comfortable.
Remember to consult with a professional mechanic if you suspect any issues with your U-joints to address the problem efficiently.

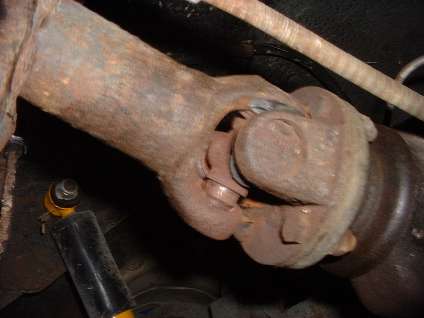
Credit: www.wranglerforum.com
Signs Of A Bad U-joint
Recognizing the signs of a bad universal joint (U-joint) in your vehicle is crucial for maintaining safety and preventing further damage. By understanding the indications of a failing U-joint, you can address the issue promptly, minimizing the risk of potential accidents or costly repairs.
Vibrations At High Speeds
Sudden vibrations, especially when driving at high speeds, are a common signal of a deteriorating U-joint. These vibrations can be felt through the steering wheel or the floor of the vehicle, resulting in an unsettling and uncomfortable driving experience. If left unattended, these vibrations can lead to more severe mechanical issues, making it imperative to address this warning sign promptly.
Clunking Or Knocking Noise
Another clear indication of a bad U-joint is the presence of clunking or knocking noises emanating from the vehicle’s underside. These sounds are most noticeable during gear changes or when applying acceleration or deceleration. Ignoring these noises can result in further damage to the driveshaft and other connected components, potentially jeopardizing the vehicle’s overall functionality.
Driveshaft Misalignment
An off-centered driveshaft is a telltale sign of U-joint wear and tear. When inspecting the driveshaft, misalignment might be evident, suggesting that the U-joint has become compromised. A misaligned driveshaft can lead to significant functional problems within your vehicle, necessitating immediate attention to prevent more extensive and costly damage.

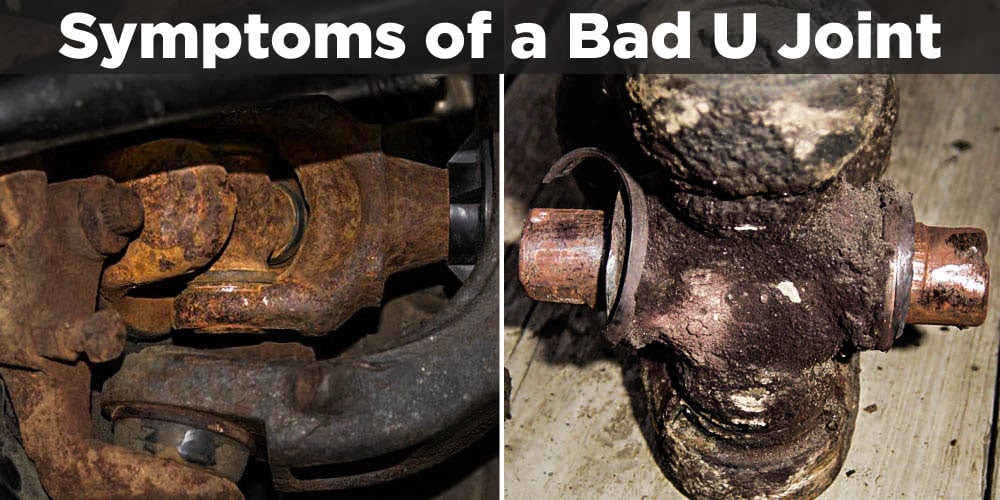
Credit: www.driveshaftsoftulsa.com
Causes Of U-joint Failure
Lack Of Lubrication
If U-joints aren’t lubricated regularly, they can wear out faster.
Excessive Wear Or Age
Excessive wear or old age can cause U-joints to make unusual sounds.
Misalignment Or Imbalance
Misalignment or imbalance in the driveline can stress U-joints.
How To Diagnose A Bad U-joint
A bad U-joint emits clunking or clicking noises while driving, especially during sharp turns. This sound often indicates a failing drivetrain component that needs immediate inspection and potential replacement to ensure safe operation. Regular maintenance and timely diagnosis can prevent further damage and costly repairs.
Visual Inspection
Inspect the u-joints visually for any visible signs of damage or wear, such as rust, cracks, or leakage.
Checking For Excessive Play
- Grab the drive shaft near the u-joint and attempt to move it up and down or side to side to feel for excessive play.
- Excessive play could indicate a worn-out u-joint that needs to be replaced.
Listening For Unusual Noises
- Listen for clunking, clicking, or grinding noises when accelerating, decelerating, or changing gears.
- Unusual noises can be a sign of a bad u-joint that requires attention.
See Also: Is Pressure Washing Cars Good Or Bad?
Consequences Of Ignoring A Bad U-joint
Ignoring a bad U-joint can lead to severe repercussions for your vehicle and your safety. Let’s explore the potential outcomes of neglecting this crucial component of your car.
Driveshaft Damage
A bad U-joint can cause excessive wear and tear on the driveshaft, leading to damage and imbalance. This can result in vibrations and annoying noises during driving, affecting your overall vehicle performance.
Transmission Or Differential Problems
Over time, a deteriorating U-joint can impact the transmission and differential, causing irregular shifting, clunking sounds, and potential leaks. Ignoring these signs could lead to costly repairs and even transmission failure.
Complete Driveshaft Failure
If left unattended, a bad U-joint can ultimately lead to complete driveshaft failure, causing your vehicle to come to a sudden halt. This not only poses a safety risk but also necessitates extensive repairs.
Replacing A Bad U-joint
A bad U-joint in your vehicle can cause a variety of annoying symptoms, from vibrations and clunking noises to difficulty turning. If you suspect that you have a bad U-joint, it’s crucial to address the issue promptly to avoid further damage to your vehicle. In this section, we will guide you through the process of replacing a bad U-joint step by step, ensuring that your vehicle is back on the road in no time.
Assessing The Severity
Before diving into the process of replacing a bad U-joint, it’s essential to assess the severity of the issue. This will help you determine whether you can safely embark on a DIY repair or if professional assistance is needed. Here are a few signs that indicate a bad U-joint:
- Clunking noises when shifting gears or changing speed
- Vibrations throughout the vehicle, especially at high speeds
- Difficulty turning or a tight feeling in the steering wheel
- Visible damage or wear on the U-joint
Gathering The Necessary Tools
Once you’ve determined that a bad U-joint is causing the issues, it’s time to gather the necessary tools for the replacement process. Here’s a list of tools that you’ll commonly need:
| Tools |
|---|
| Socket set |
| Wrench set |
| Pliers |
| Vice grips |
| Hammer |
| Driveshaft puller |
| PB Blaster rust penetrant |
| Grease |
Removing The Driveshaft
Now that you have your tools ready, the next step is to remove the driveshaft from the vehicle. Here’s a step-by-step guide:
- Ensure the vehicle is securely lifted and supported on jack stands
- Spray the driveshaft bolts with PB Blaster rust penetrant
- Use a socket set and wrench to remove the bolts securing the driveshaft to the transmission
- Slide the driveshaft out of the transmission carefully
- If needed, mark the orientation of the driveshaft for easier reinstallation
Replacing The U-joint
With the driveshaft removed, it’s time to replace the bad U-joint. Follow these steps:
- Use a vice grip to hold the driveshaft and remove the U-joint caps with pliers
- Push the U-joint caps out of the driveshaft yokes
- Remove the U-joint from the driveshaft
- Grease the new U-joint and insert it into the driveshaft yokes
- Align the new U-joint caps with the yokes and press them in firmly
Reinstalling The Driveshaft
Now that you have replaced the bad U-joint, it’s time to reinstall the driveshaft. Follow these steps:
- Align the driveshaft with the transmission and slide it back in
- Use your socket set and wrench to tighten the driveshaft bolts
- Follow the manufacturer’s torque specifications to ensure proper tightening
- Double-check the driveshaft’s orientation if you had marked it earlier
- Lower the vehicle from the jack stands and take it for a test drive
Preventative Maintenance For U-joints
Regular maintenance and care are essential to keep your vehicle running smoothly, and this includes paying attention to the condition of your U-joints. These critical components of your vehicle’s drivetrain are responsible for transmitting power from the transmission to the wheels, allowing for smooth and efficient movement. To prevent potential issues and costly repairs, it’s important to perform routine preventive maintenance on your U-joints. This article will explore three key aspects of preventative maintenance for U-joints: regular lubrication, routine inspection, and proper alignment.
Regular Lubrication
Keeping your U-joints adequately lubricated is crucial for their longevity and smooth operation. Lack of proper lubrication can lead to excessive friction and wear, eventually causing the U-joints to fail. Regularly lubricating your U-joints will help reduce the chances of premature wear and extend their lifespan.
- Use a high-quality grease specifically designed for automotive applications.
- Apply the grease to the U-joints following the manufacturer’s recommendations.
- Make sure to grease all the relevant fittings and ensure even distribution of the lubricant.
Routine Inspection
Regularly inspecting your U-joints is essential to identify any signs of wear or damage promptly. By detecting potential issues early on, you can take the necessary steps to prevent further damage and avoid unexpected breakdowns.
- Visually examine the U-joints for any signs of rust, cracks, or excessive play.
- If you notice any unusual sounds, such as squeaking, clunking, or knocking, it may indicate a problem with the U-joints.
- Check for any leaks around the U-joint seals, as this can be a sign of damage or inadequate lubrication.
Proper Alignment
Ensuring proper alignment of your U-joints is crucial to maintain their optimal operation and prevent premature wear. Misalignment can put excessive stress on the U-joints, leading to accelerated wear and potential failure.
- Regularly inspect and adjust the phasing of the U-joints to maintain proper alignment.
- Check for any signs of misalignment, such as vibration or irregular tire wear, and address the issue promptly.
- Consult a professional mechanic if you suspect any alignment problems with your U-joints.
By following these preventative maintenance practices for your U-joints, you can ensure their longevity and prevent costly repairs down the road. Regular lubrication, routine inspection, and proper alignment are key to keeping your U-joints in optimal condition and ensuring a smooth and reliable driving experience.
Common Misdiagnoses
Identifying the source of a problematic U-joint noise can be challenging, leading to common misdiagnoses. Before assuming a bad U-joint, it’s essential to understand the alternative causes of similar noises.
Tire Or Wheel Issues
If your vehicle is making a noise that resembles a bad U-joint, consider the possibility of tire or wheel issues. Uneven tire wear, tire cupping, or a bent wheel can produce similar sounds, causing confusion with U-joint problems.
Differential Problems
Differential problems can mimic the sound of a failing U-joint. An improperly lubricated or worn-out differential can produce clunking or clicking noises that are often associated with U-joint issues. It’s vital to inspect the differential before concluding a U-joint problem.
Suspension Components
When assessing U-joint symptoms, it’s crucial to rule out potential noises stemming from suspension components. Worn-out or damaged control arms, bushings, or ball joints can cause similar clunking or knocking sounds, leading to a misdiagnosis of a bad U-joint.

Credit: www.suspension.com
Conclusion
Recognizing a bad U-joint sound is crucial for vehicle maintenance. Regular inspections and addressing any unusual sounds promptly can prevent further damage and costly repairs. By understanding the distinct noise associated with a bad U-joint, you can take proactive steps to ensure the safety and longevity of your vehicle.


